Photography Primer for Evidence Photography
By John Hamilton, MSME PE, 2001
Introduction
This is written to assist those who need to photograph objects that may be used as evidence and only have at their disposal a camera with a single one-camera flash. It is the goal of this paper to explain how to record as much detailed information as possible with a camera and single flash. It is assumed that the photographer will have minimal control over where the objects are located and will not have access to complex lighting equipment.
Exposure
Photographic images are formed on film by light reacting with light sensitive chemicals within the film. Outside of focusing, all the controls and settings within the camera regulate the amount of light that reaches the film. There are three basic exposure controls on a camera that deal with exposure: Film speed, Aperture (f-stop), and Shutter speed. Each of the above controls the amount of light reaching the film and has side effects on the image. Photographers measure the amount of light in terms of exposure value (ev) or "stops". Each stop increase in light represents twice as much light as the previous stop.
Before discussing the effects each of these controls has on an image, it is important to understand what each of the controls does.
Film speed is the sensitivity of the film to light. The higher the film speed number the more sensitive the film is to light, and consequently less light is needed to obtain a proper exposure. The speed scale is linear; every time film speed is doubled the amount of required light is reduced by a factor of two. For example, 400-speed film requires only half as much light as 200-speed film, and only a quarter of 100-speed film. Film speeds can vary from 6 all the way to 3200. Usually any speed less than 64 is used by professional photographers and hobby artists. Most consumers use film between 100 and 800. As can be seen, each doubling of film speed number represents a one stop change in the amount of light required.
Film speed is typically increased by using larger grains of emulsion on the film. This is why higher speed film appears grainy. Because of this reason artists often use low speed film in an attempt to minimize the grain in a photograph.
Some film speeds get more attention from manufacturers than others do. At this time 400-speed film is extremely popular and therefore lots of R&D has been pumped into this speed of film. As a result most 400-speed films have a grain size almost equivalent to 200-speed film. Therefore, never use 200-speed film. It will not give any grain benefits over 400-speed film and will require more light. The primary side effect of film speed is grain or the lack thereof. As a rule of thumb use the slowest film possible to minimize grain. For most of our photography a good 400-speed film is adequate. I recommend either Kodak or Fuji. These are the giants in the industry and the ones that do most of the R&D. The other manufacturers are typically years behind in emulsion technology.
Aperture (f-stop) is a measure of the diameter of the aperture that the light passes through on its way to the film. Numerically the number is the ratio of the aperture diameter to the focal length of the lens. For most 35mm cameras the range of apertures runs from 1.8 to 32. That being said, the outer limits of what was just listed are rare, especially for zoom lenses. Markings on a lens typically go 2.8, 4, 5.6, 8, 11, 16, 22, and 32. Each one of these increments represents a one-stop decrease in aperture diameter. Each stop also represents a decrease in light transmission by a factor of 2. Notice that each number is the previous number multiplied by the square root of 2. That is because the number is the diameter of the aperture divided by the focal length of the lens, a linear dimension. But what is of concern is the amount of light that passes through, which depends on area. Each increase in f-stop number represents a decrease in area by a factor of 2. It is important to note that the amount of light reaching the film depends on f-stop and is independent of focal length of a lens. If we use a 50mm lens or a 200mm lens we have the same amount of light reaching the film if we use the same f-stop number, even though the aperture on the 200mm lens is 4 times the diameter of the 50mm lens. This is because the aperture on the 200mm lens is further away from the film than the 50mm lens. The primary side effect of aperture is depth of field (DOF), which will be discussed more later. As the aperture number increases the depth of field likewise increases.
Shutter speed represents how long the shutter is open, allowing light to fall on the film. Typical shutter speeds fall between 1 and 1/1000 seconds, although many modern cameras can go from 30 seconds to 1/8000 seconds. Typically shutter speeds progress as follows: 1, 1/2, 1/4, 1/8, 1/15, 1/30, 1/60, 1/125, 1/250, etc. Each number represents a reduction in time by a factor of 2, and likewise a cutting in half of the light that reaches the film. In other words, each number represents a one stop difference in the amount of light reaching the film. The primary side effect of shutter speed is motion blur or lack thereof. As the shutter speed is decreased the camera loses its ability to freeze motion, whether that motion is the subject moving or the camera shaking. Generally, for stationary objects use a shutter speed no slower than 1/focal length. Therefore if using a 50mm lens, make sure the shutter speed is faster than 1/50s. If using a 200mm lens, make sure it is faster than 1/200s.
Tying exposure together. As discussed, film speed determines how much light is required to properly expose the film, while shutter speed and aperture control the amount of light that actually reaches the film. For any given lighting situation with any given film, there are numerous combinations of shutter speeds and apertures that will yield a properly exposed photograph. For example, let’s say we are using 400-speed film and the camera tells us that we need an aperture of f8 and a shutter speed of 1/500s to get a correct exposure. We can change aperture as long as we adjust the shutter speed to compensate. If we chose to increase the f-stop number to f11 this would reduce the amount of light reaching the film by one stop or by a factor of 2. We would then need to compensate by reducing the shutter speed to increase the amount of light by one stop, this would require changing the shutter speed to 1/250s. Likewise we can get a proper exposure using f22 and 1/60s, or f5.6 and 1/1000s. These settings are up to the discretion of the photographer depending on the situation and what his emphasis is.
Camera meters and their controls. Almost every camera has a light meter built into it that measures the amount of light. Most cameras have for years incorporated some sort of smart device within the camera to be able to take the measured light readings and the film speed and inform the user what settings, shutter speed and aperture settings will give a correct exposure. Older cameras did this by allowing the user to change the camera settings and then informing the user when the setting would yield a proper exposure. Newer cameras incorporate computer technology that will choose the settings for the photographer. Most modern SLRs (Single Lens Reflex) cameras have various exposure modes to allow the user some flexibility.
In fully automatic mode the camera chooses both the aperture and the shutter speed. The computer takes the measured light reading and the film speed and computes what the aperture and shutter speed should be. These can yield good exposures but in most cases will not be optimized for what the photographer wants. Remember that once the light value is established and the film speed is known, the only two variables that are left are shutter speed and aperture. Most all SLRs have the ability to allow the user to choose either of these variables and then the camera will choose the value for the remaining variable. One such setting (that the author uses almost exclusively) is what is called "aperture priority". In this setting the photographer chooses the aperture and the camera sets the shutter speed to obtain a proper exposure. There is also "shutter priority" In which the photographer sets the shutter speed and the camera chooses the aperture. Aperture priority mode is used when depth of field is important, as the aperture setting has a large bearing on depth of field. Shutter priority mode is used when motion effects are most important, for example, shooting a sporting event where motion most be frozen by means of a fast shutter speed. Cameras can also be set in fully manual mode where the photographer chooses both shutter speed and aperture.
Modern SLRs use through-the-lens (TTL) metering. That means that the light sensors for the meters are located in the camera in such a way that the light reaches them by passing through the lens. Some of the older cameras had the light meter on the outside and did not offer as accurate an exposure.
Except for a $2000 Nikon F5, cameras are colorblind and dumb. A camera is designed with the assumption that whatever it is photographing is a middle shade of gray. It will therefore set the camera to expose whatever it sees in a way to create a gray photograph. Usually this is not a problem unless your subject is predominantly black, or predominantly white. If the subject is white the camera says to itself "Dang, it is bright, I better be careful or this gray object I am looking at will be overexposed and look white". This is a common problem for outdoor photographers shooting snowy landscapes. White is about 2 stops brighter than gray; therefore, most photographers will set the camera about 2 stops overexposed when shooting white to avoid having gray looking snow. In the same way, black objects will make the camera think there is less light than there actually is and will create an overexposed picture in the camera’s attempt to make the object a middle gray. One way to deal with this is to meter off the hand. If a photographer is unsure of whether or not the subject matches middle gray he will place his hand where the object is and take a reading of the palm of his hand with the camera. He will then set the camera to that exposure.
Of some concern is what area the camera meters. On better SLRs this is adjustable. Most high end cameras will allow the user to select either the entire area being covered, a relatively small area of the center of the image, or a small spot in the center of the image. Even when the camera is metering the whole area, the computer emphasizes the center more than the outer areas. This is important to know when the background is lit differently from the object. For example, if the background is substantially brighter than the object and the camera meter picks up the bright background, the object will be underexposed.
Lens Focal Length
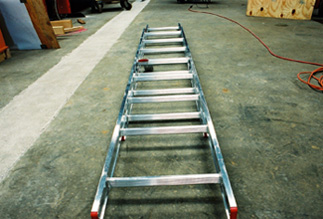
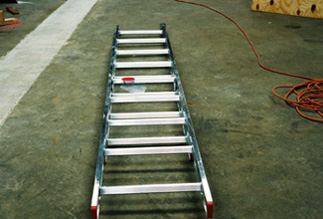
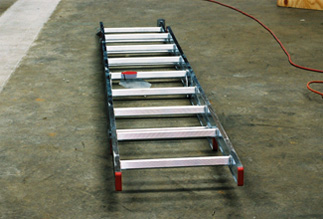
The most noticeable attribute of lens focal length is that the longer the focal length the more the camera acts like a telescope in making far objects appear close. The longer lenses are called telephoto lenses while lenses with shorter focal lengths are called wide-angle lenses. This effect is due to the fact that the area f coverage of the lens depends on the focal length of the lens. Longer lenses have smaller areas of coverage. Each film format has what is referred to as a "normal" lens. This is the focal length that will produce an image that appears the way we would see it with our eyes. Lenses that are longer than the normal lens tend to compress objects and minimize the distance between objects in a photograph. Wide-angle lenses do the opposite and tend to expand objects. It is my practice to always use a normal lens when shooting for forensic work. For a 35mm camera the normal lens is one that has a focal length of 50 mm. This way, when I get a photograph back I know that I am looking at it from a normal perspective and have a better chance of accurately scaling off the photograph. Many modern consumer zoom lenses have an approximate range of 28mm-80mm. To demonstrate the difference in perspective, a ladder was photographed with 28mm, 50mm and 80mm lenses.
Depth of Field
One of the primary technical goals of a forensic photograph is that everything of interest be in focus. Depth of field is a term that represents how much of a scene is in focus. A deep depth of field means that near and far objects both appear in focus. A narrow depth of field means that either near or far objects are in focus. Figure 1 shows a picture where the depth of field was very narrow. Note that not all of the head is in sharp focus and that the background is an indistinguishable blur. Figure 2 shows a landscape deep depth of field where near and far objects are both in focus.
Depth of field for a particular focal length lens is determined by the aperture setting. As the f-stop number increases and the aperture becomes smaller, diffraction of the light passing through the aperture tends to focus the image. At wider apertures the diffraction effects are diminished and depth of field is narrowed. Many lenses have markings on them that will show the range that is in focus for a given aperture. Taking a look at depth of field on a 50mm lens we see that if the camera is focused at 4 feet and the aperture is set to f22, everything between about 2.75 feet and 7 feet will be in focus. If we focus at the same 4 feet and set the f-stop at f3.5 the range that is in focus is only about 3.5 to 4.5 feet. If we focus at 15 feet and set the f-stop to f22 the depth of focus now starts at 7 feet and extends to infinity. This shows that the depth of field gets deeper the further away the object is that we focus on. There are two ways to ensure that the photograph keeps all points of interest in focus. The first is to increase the f-stop. If that fails to give us a sufficient depth of field then we may need to back away from the object. I would recommend usually having the camera set at f11 or f16 unless the light is so low that it drops the shutter speed under 1/60s or if the extra depth of field of f22 is needed. On all most all modern automatic SLR cameras there is a setting called aperture priority. When the camera is in this mode the user can adjust the aperture and the camera will select the correct shutter speed for proper exposure.
Flash and Natural Light Photography
Flash is one of those inventions that photographers both love and hate. Nothing can ruin a photograph like too much flash. But also, many photographs can never be taken without flash. Flash is predominately used when shooting inside, where there is little to no sunlight. Most indoor flash photographs look terrible. Unfortunately, most of this is due to the laws of physics, particularly the inverse square law of light intensity drop-off from a point source. What we have with a flash in all practical purposes is a point source of light. Let's say we want to take a picture that has 2 objects in it, one object being 5 feet away, the other 10. Because of the law of physics, the near object will have 4 times as much light on it as the far object. Most modern cameras have through the lens (TTL) flash metering of the flash. That means that the camera measures the amount of light coming back through the lens and shuts the flash off when enough light has entered the lens. This is a great invention but has to be understood or it can lead to problems. Think of photographing a machine that is 5 feet away with a dark wall 40 feet away as the background. Using a basic TTL flash, the flash will continue to crank out light until the dark wall is illuminated. When the camera operates this way the machine ends up being horribly overexposed and machine detail is lost. There are several ways to address this depending on the camera system being used. Probably the easiest way is to ensure that the object fills as much of the view screen as possible. This will reflect more light back at the camera than the far dark wall will and the flash will shut off when the machine is properly exposed. On some cameras the area that the camera measures light can be adjusted. If this is possible set the light meter in the camera to an area that just covers the object being photographed, The Canon Rebel that we have does not have this option. Another technological solution is offered in some Nikon lenses. Nikon "D" lenses tell the camera how far away the object is and the camera computer calculates the amount of flash needed and uses that to get a proper exposure of the object. Another procedure to use for good flash photography is to bounce the flash. If the photographer is in a room with a low ceiling and has a swivel flash, the flash can be pointed to the ceiling and the reflected light should illuminate the subject. Whenever this is done, a back-up picture should be taken with the flash pointed at the machine.
Light can also be a problem outdoors, especially on bright days. The perfect outdoor light would be a cloudy overcast day with no shadows. The reason that shadows in strong daylight cause problems is that film can handle only so much latitude in the amount of light (exposure) it receives. If one part of the image receives the correct exposure and another part is in shadows so that there are a couple of 3-4 stops difference in exposure, then the shadow area will come out near black. Likewise if the shadow area is exposed properly the bright areas will be blasted white. The easiest way to deal with this is to get the object into shade and make sure that when the picture is taken the camera is not metering a sunny background. Sometimes this is not possible. When it is not possible to get the object in shade the next best solution is to use fill flash. Fill flash is using the camera’s flash to illuminate the shadows in a sunlit object. This can get tricky at times, depending on the camera system being used. Nikon has a very good system that measures the available light and sends out enough flash to make sure everything is illuminated properly. This is what they call "matrix balanced fill flash". I use it frequently and usually set it so that the flash puts out a little less flash than is necessary. This provides good shadow reduction without getting some of the adverse effects of flash. One important characteristic of a camera is its maximum flash sync speed. That is the maximum shutter speed that can be used with a flash. With the better Nikons (and some others) the flash can sync with a shutter speed up to 1/250s. With some cameras like the Canon Rebel G, the maximum sync speed is only 1/90s. This becomes critical in sunlit situations. If we are using 400-speed film in bright daylight even at the maximum aperture of f22 the shutter speed for correct exposure will be greater than 1/90s. This means that the highlights will be overexposed. A solution to this problem is to also carry some 100-speed film; this will allow the shutter speed to drop down below the maximum sync speed of the camera. Although it is often desirable to adjust the output as I mentioned earlier, the flash on many cameras such as the Rebel is not capable of adjustment.
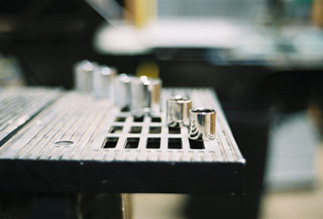
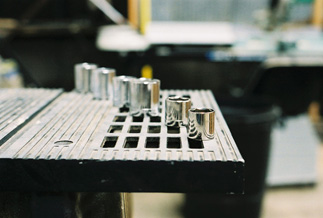
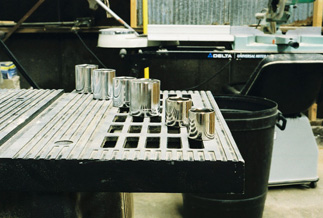
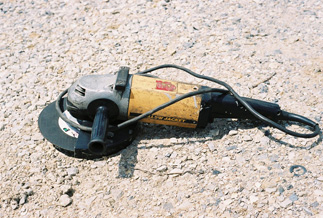
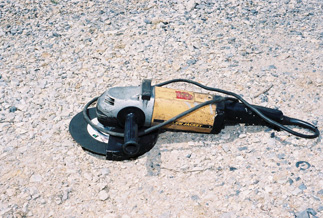
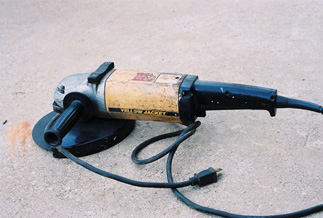
The series of photographs below show the effect of lighting on an object. The photograph on the far left was taken in direct bright sunlight. Notice the deep clearly defined shadow. Some detail is lost in these shadows. With some more complex objects the shadows would be totally black and contain no detail. In the center photograph the flash was used. Notice that the shadows are diminished. ASA 400-speed film was used and the aperture was set to f22. Even at that small aperture the shutter speed was set to over 1/250s for proper exposure and would not allow me to use the flash. To get around this I metered off the shadows by pointing the camera at the shadow area under the grinder. This reduced the flash output though and didn't totally eliminate the shadows. A 100-speed film would have allowed me to meter the illuminated area and obtain greater shadow reduction.
Applications
The goal of forensic photography should be to get sharp properly exposed photographs that contain as much information as possible. This is accomplished by making sure that all important areas are in focus, that motion blur does not occur, and that no detail is lost due to either under or overexposure of areas in the image. The following tips will help accomplish this goal:
- Set the camera to aperture priority mode.
- Use an f-stop of f11 or higher.
- Don’t shoot in bright daylight if possible.
- If you must shoot in bright daylight, use 100-speed film and the flash.
- When using flash indoors, try to make sure that the object fills most of the screen; also try to shoot so that all objects in screen are the same distance from the camera.
- Make sure a background or foreground at a different light level than the object does not overly influence the camera.
- Meter off the palm of the hand if subject is either a very bright or very dark subject.
What about Digital?
Digital photography has been making many leaps forward in recent years. It holds great promise in several areas. Right now our target for picture quality should be the ability to create sharp accurate 8"X12" prints that can be used as exhibits. To accomplish this we must look at the resolution needed to obtain that. For a quality print 400 dpi is usually used; for an 8"X12" this would require 8x400x12x400=15.3 megapixels. This is way beyond the capability of all cameras at this time. Some very good images have been made with top of the line Nikon and Canon digital SLRs that are only about 5 megapixels. Unfortunately, these cameras are in the neighborhood of $5000 apiece.
Currently a person can get images scanned at many mini-labs or even Wal-Mart for about 20 cents apiece. These images are 1038x1536, which is 1.59 megapixels. This file size exceeds that of most consumer grade digital cameras, and does not even begin to capture all the information contained in a 35mm negative. At this point there is rumbling that judges are not allowing digital images in as evidence because they are easily tampered with. I would say that at this time digital is not the way to go with forensic photography.